The previous two articles outlined the magical firmware, the method of installing the firmware, and some useful auxiliary functions of the firmware for taking photos.
 Make Canon Camera Full of Magic Chapter One: Magic Lantern Firmware Brush and Features Introduction Magic Lantern is an external firmware for Canon cameras. Chinese is called “magic lampâ€. It was first written by Trammell Hudson in 2009 for Canon EOS5DMark II. In July 2010, it was ported to the 550D/T2i/KissX4 (official firmware version 1.0.8). The current main developer is A1ex, the firmware supports most of the mainstream mainstream Canon SLR coco770108 | Like32 Comments48 Favorites225View details
  Make Canon Camera Full of Magic Part II: Magic Lantern's Photo Enhancement Utility Feature The previous article outlined this amazing firmware and installation method. Let the Canon Camera Be Full of Magic Chapter One: Magic Lantern Firmware Brush and Features Introduction Canon Camera is Full of Magic Chapter One: Magic Lantern Firmware Brush and Features Introduction... Preface Magic Lantern is a plug-in for Canon cameras... coco770108 | Like 24 comments 30 Favorites177 View Details
 This article mainly introduces the most powerful features of Magic Lantern, the preparation and setup of video RAW shooting, and a workflow for later video capture.
First, preparatory 1) What is RAW video?What is RAW video? A video is a combination of frames, photos, and frames. RAW video captures a frame of a photo with a photo RAW. Just like JPG, which is a photo RAW file, it can capture more image information and provide more room for post-editing.
However, its processing flow is relatively complex. First of all, what you capture from the camera is the MLV file. This file needs special tools to unpack the CDNG sequence and WAV audio file (if there is recorded audio). At 24 frames per second, 10 seconds of MLV will extract 240 DNG files. Then this CDNG sequence is imported into software like AE, Pr, Davinci, etc., and after correction and color correction, the video file is synthesized as a backup material.
A comparison in the past may be more illustrative. All are shot with 1080P resolution (RAW resolution is a little bit smaller, 1920×1076, zoomed in by AE magnification 100.5%.)
Network video compression is relatively large, but the black cushion texture in the dark part of the cabinet segment can be seen.Below is a screenshot of the original footage
 Left H.264, right RAW
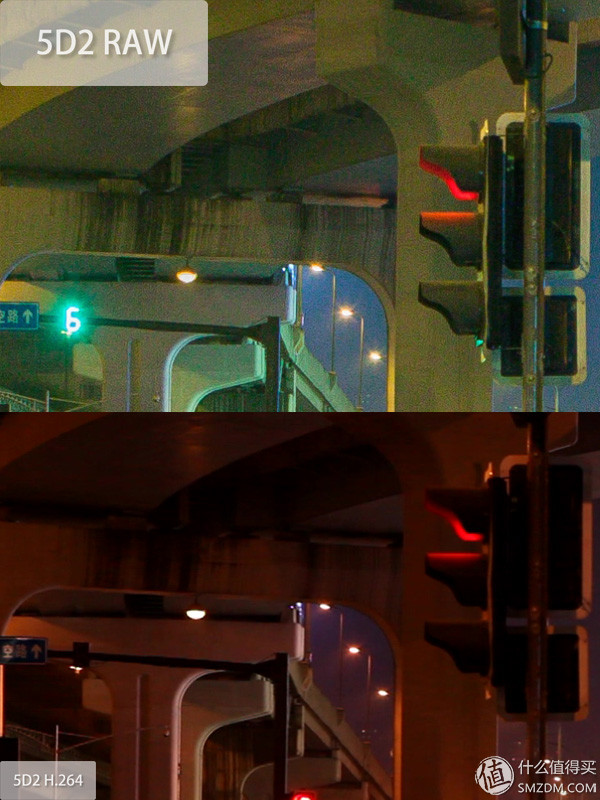 After research, it was found that the image of ZDM can only be displayed to the width of 600PX, and the original image is 100%.
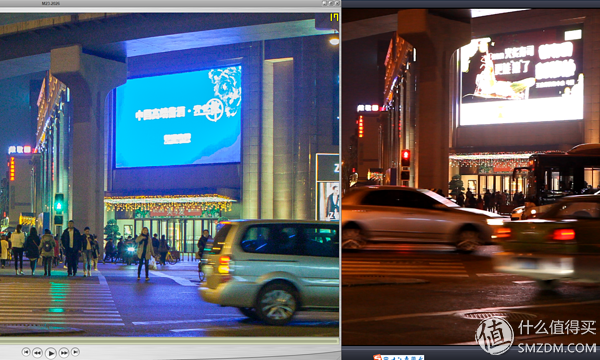 Left RAW, right H.264
 100% magnification on the right side of the display
 Left RAW, right H.264
 After research, it was found that the image of ZDM can only be displayed to the width of 600PX, and the original image is 100%.
 Left H.264, right RAW
Through this simple set of comparisons, I can have a general understanding of RAW video.
2) Understand the writing speed requirements and calculation methods of RAW videoFirst of all, you must first understand the speed of your Canon camera to read and write the memory card, and then you have to know the maximum writing speed of your memory card (SD/CF card). Then you need a calculator. According to the following formula to calculate the maximum shooting size you can get:
(Long-edge pixel × wide-side pixel × video color bit depth × frames per second) ÷ 8 ÷ 1024 ÷ 1024 = speed per second written to memory card MB/S
For example, take a 720P 14bit color 24-frame segment, (1280×720×14×24) ÷8÷1024÷1024=36.9MB/S, that means you want to be smooth and keep shooting 720P 14-bit RAW video, you The memory card write speed is at least 37MB/S. Continuous recording of 1080P RAW video requires more than 83MB/s write speed.
In the dual constraints of the memory card and the body write speed (the bottleneck of the memory card is not too big now, but the high speed card is more expensive; the maximum speed limit of the fuselage is relatively large), the type of RAW video capable of continuously recording 1080P At present, there is only one, that is, 5D3. Other models do not mean that they cannot shoot. Write speeds may not be written for a few seconds, and tens of seconds will automatically stop.
 This table is relatively old on the GOOGLE DOC, but the data is always unchanged.
Understand the approximate calculation, in fact, when setting Raw Video (MLV), ML will tell you the bit rate needed to record MLV at each resolution and frame rate.
A high-speed card is indispensable, and the larger the capacity, the better. 1080P 14bit video RAW, 32G card can roughly record 7-8 minutes, 64G card is roughly recorded 16 minutes, 128G is also more than 30 points. It is simply a weapon for murdering memory cards and big sisters' villas.
3) Learn how Magic Lantern's RAW video recordings are sampledWhy most models of pixels is much larger than 1080P, and can not record 1080P video. In addition to the limitations of the memory card and body writing speed, you also need to understand the sampling method used by ML in RAW video recording.
RAW video recording mainly has 3 sampling methods, 3x3 (1:1 mode), 3x5, 1x1 (3x crop).
The 3x3 mode works on the 1080P video recording mode selected in the CANON firmware and performs 1:1 recording when entering the LV screen, also known as 1:1 mode. This time corresponds to the sampling of long and wide edges by 3 times in CMOS. Because CMOS is a 3:2 aspect ratio, the main limitation when recording a 16:9 video is the long side width of the CMOS. By the following calculation, the long side pixel CMOS3 of the CMOS (photo camera) is the maximum width of the video that can be recorded in this mode. For example, the size of a 5D2 photo is 5,616*3,744, and the maximum width that a 5D2 can record in a 1:1 mode is 5616÷3=1872, which is slightly less than 1920. The 5D3's photo size is 5760 × 3840, and the maximum width of the 5D3 recording in the 1:1 mode is 5760 × 3 = 1920, which is just 1920 pixels long side width.
The 3×5 mode works on the 720P video recording mode selected in the CANON firmware. It also performs 1:1 viewing and recording when entering the LV screen, but the output video is compressed by the wide side (compressed to the original width. 3/5). It is mainly used for shooting 50P or 60P slow motion video such as 5D3. In this mode, the video needs less vertical width, so its limit is still limited to the horizontal long side pixel limit, which is also the CMOS (photo camera) long side pixel ÷3 = the maximum width of the video that can be recorded in this mode.
The 1x1 (3x crop) mode refers to the function that is turned on after pressing the camera zoom-in button to enter the 5x zoom mode during RAW video recording, and recording is performed in this screen. This function uses the camera's 1:1 pixels to record video samples, that is, how many pixels the camera can theoretically record, how many pixels of video can be recorded (a bit like the Nikon camera's function of clipping the camera, only use The pixel in the middle of the camera). So in this mode, limiting the size of the video recording format mainly comes from the limitation of firmware support and writing speed. For example, 5D2 can get 2144 horizontal long side pixels in this mode, and 500D can also get more than 1920 horizontal long side pixels.
4) Functional modules in ML that need to be usedMagic Lantern after the original brush is not loaded RAW video recording related functional modules, you need to manually load from the Module menu.
The plug-ins needed to record RAW are as follows:
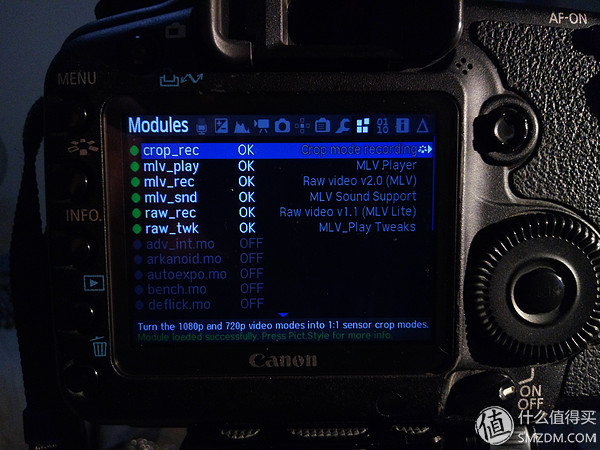
Mlv_rec: Version 2.0 plug-in for RAW recording. After starting it, the Raw Video (MLV) option appears under Movie in the ML menu. Turn it on for RAW recording
Raw_rec: RAW recording version of the 1.1lite plug-in, the Raw Video option appears under Movie in the ML menu. The function is less than 2.0, more concise, and 2.0 only need to open one.
Mlv_snd: RAW voice recording plugin. After opening, the MLV Sound option appears under Audio in the ML menu.
Raw_twk: Auxiliary adjustment tool in RAW video recording. After opening, the Movie Tweaks option appears under Movie in the ML menu. Mainly used to adjust FAT32 recording to automatically restart recording after reaching 4G.
Crop_rec: A plug-in for 1x1 (3x crop).
Mlv_play: RAW video playback tool on the camera. With the Raw Video (MLV) or Raw Video option turned on, press the camera playback key to view the RAW video on the camera.
Second, RAW recording and related settingsThrough the foregoing description, we should have a general understanding of the recording requirements of RAW video.
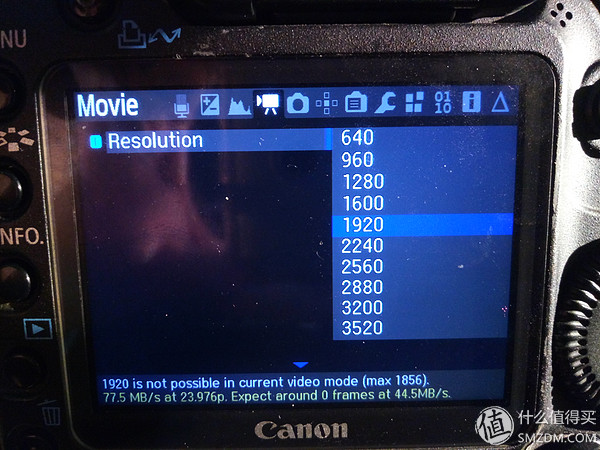
1) Main settings of Raw Video (MLV)Press the delete key to enter the ML menu, open under Movie in the ML menu and enter the Raw Video (MLV) option. Here take 2.0 as an example (1.1lite and 1.0 have fewer options than 2.0)


Resolution: Select the resolution of the video to be recorded here. Press the SET key to enter the secondary menu. You can select the long side of the video (larger range) or through the camera's left and right keys (or joystick) under the MLV main menu.å·¦å³ å·¦å³ å·¦å³ æ¥ æ¥ ã€‚ 。 。 。 。 。.
Aspect Ratio: Aspect ratio, the main ones are 16:9, 1.85:1, and 2.35:1. Considering the stability of the screen and other post-cutting needs, this is what you need.

Bit Depth: The latest version of Nightly, which is officially released, is only 14bit, and 10 and 12bit are added to the test version. Because the general display device only has a bit depth of 8-10 bits, it can be seen from the calculation formula of the bit rate that if the recording is performed with 10 bits, the code rate of the same resolution is much lower than that of 14 bit. So for experienced users, Magic Lantern released 10-12bit related plug-in modules, and not necessarily very stable. With bit depth reduction, 5D3 can support continuous shooting of 3200x1200 pixels video. 5D2 can also support more than 2K resolution for continuous shooting. About the 10-12bit is not stable, can only be used in the 3×Crop mode on the Digic 4 camera (5D2, 7D, 50D, 550D, 500D), use the top in the LV1:1 (3×3) mode 50-100 pixel range will have wrong color blocks.
Create Directory: Whether to create a folder for recorded video. Suggest OFF.
Global Draw: Whether to draw the UI of the LV globally during recording. It is recommended that you turn OFF. This will increase your speed.
Frame Skipping: Whether to allow frame skipping to increase the recording time during recording. This must be OFF. If you turn off, drop frames will stop when the video is recorded. When it is turned on, the time is extended, and the video after the moment of the first dropped frame jumps, and there may be only 2 or 3 frames per second.
Preview Options: Preview mode, generally use auto. Mainly affect the real-time synchronization speed of the display when recording, some low-level cameras may appear to stop the screen, etc.
Status When Recording: There are three options, none, icon and debug. None is nothing. Icon is a small icon for recording a video when recording, and real-time writing speed. Small icon will have 3 colors, red, yellow and green; red means camera cache will be full, write to camera cache is much faster than cache write The speed of the memory card will stop the recording; Yellow means that the speed of writing to the camera's cache is slightly faster than the buffer's speed of writing to the memory card, but it can also take a longer time to shoot; green means write to the camera's cache speed is less than or equal to the cache's write to the memory card The speed can take long shots. Debug is to display DEBUG information while recording.
Start Delay: It means setting a few seconds after pressing the video button to take a picture, not self-portrait. Recommended OFF.
Digital Dolly: Moving the frame is as if it doesn't work. Recommended OFF.
Card warm-up: Preheating your memory card can increase the speed of certain models and memory cards while recording. Recommendation 32M.

Use SRM job Memory: Allocate memory from the SRM job's cache. Can improve the recording speed of some models.
Extra Hacks: After opening, the exposure settings under the ML's EXPO page will be used instead of Canon's exposure controls.
Debug Trace: Debug's real-time trace, if you do not compile and find the wrong, there is no need to open
Show Buffer Graph: Shows the use of the camera cache in the LV as an image.
Buffer Fill Method: There are 0-4, a total of 5 options, according to their own memory card to test, that way is more suitable for their own memory card.
Reserve Card Space: Whether to reserve space on the memory card.
Tag: Text: Custom file name.
Tag: Take: is the custom file number.
2) MLV Sound settingsPress the delete key to enter the ML menu, open it under Audio in the ML menu and enter the MLV Sound option.


Sampling Rate: Audio sample rate selection, 48kHz, 44.1kHz, 22kHz, 11kHz, 8kHz. In general, the highest choice is on the line.
Trace output: Traces the audio capture and generates a LOG file.
3) FPS Override settingsPress the delete key to enter the ML menu, open it under Movie in the ML menu and enter the FPS Override option.

In this option, the Desired FPS (Required FPS) is mainly used to lock the number of frames for video capture.
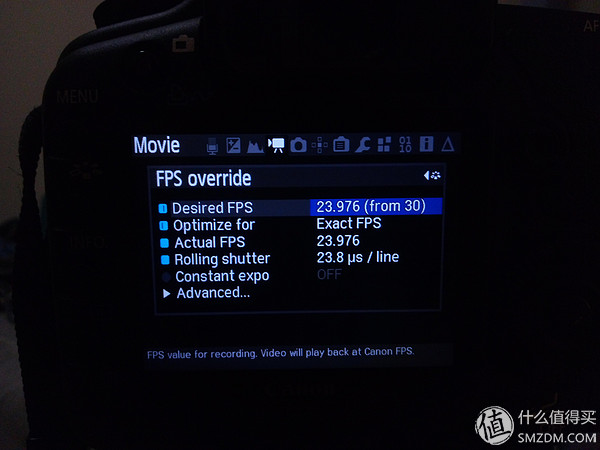
After setting these options, you can record RAW video. What is done in LV 1:1 mode is video recording of (3×3) samples. After pressing the zoom in key to enter the 5x zoom mode of the LV, the camera will enter the (1×1) sampled 3×crop mode for recording.
MLV file in camera memory card == import ==> MLV decompressor or preview program == decompression ==> CDNG image sequence (and audio file) == import LRPSAEPRDavinci etc ==> correct and adjust cdng image = = Synthesize video clips by AEPR Davinci et al. ==>.
This is a basic workflow. The main need for preparation here is the MLV unpacking process. Others are commonly used video and photo editing software.
This is Magic Lantern's official RAW video processing forum. All MLV unpacking tools as well as AE, PR, and Davinci plugins can be found here.
 Raw Video Postprocessing Raw Video Postprocessing Direct Links
 The main commonly used MLV unpacking tools are
MlRawViewer (WIN & MAC), this software can be easily previewed, can batch convert MLV to MOV or DNG format.
download link:
https://bitbucket.org/baldand/mlrawviewer/downloads/MlRawViewer_1_3_3_win32.zip (WIN)
https://bitbucket.org/baldand/mlrawviewer/downloads/MlRawViewer_1_3_3_mac.dmg (MAC)
MLV Mystic (Win & Mac), this software can not only handle MLV, but also supports batch conversion of Dual ISO. Individuals use this software under MAC.
download link:
http://secondsparkproductions.com/downloads/mystic/MLVMystic_v0.5(Beta).zip (WIN)
http://secondsparkproductions.com/downloads/mystic/MLVMysticV05Beta.dmg (MAC)
MLVProducer (WIN), the author only out of the WIN version, and according to different CPU out of two versions, the function is very powerful, not only can handle ordinary MLV, HDR video can also handle, can output many formats, The preview also corrects the black level, color temperature, and correction of bad pixels that appear in the shot. It has some ACR (LR) functions to make some quick adjustments to the video. Overall, under WIN, individuals recommend this software. download link:
https://sourceforge.net/projects/mlvproducer/files/mlvp.alpha.build2722.INTEL.zip/download (Intel)
https://sourceforge.net/projects/mlvproducer/files/mlvp.alpha.build2722.AMD.zip/download (AMD)

MLVFS (Win&Mac), a relatively old software for converting MLVs. 2016 began to support WIN, previously only supported MAC,
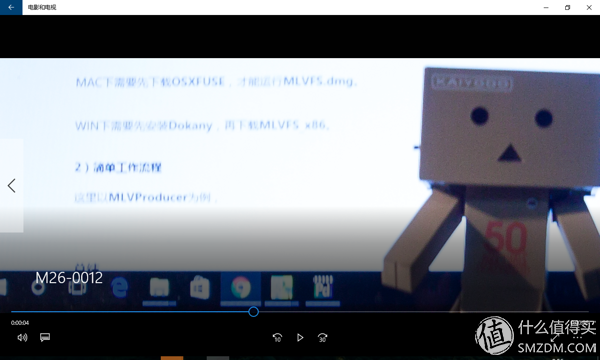
Under the MAC, you need to download OSX FUSE before running MLVFS.dmg.
Dokany needs to be installed under WIN before downloading MLVFS_x86.
2) Simple workflow2.1 MLV export and unpack
Here takes MLVProducer as an example, first find and open MLVProducer.exe.

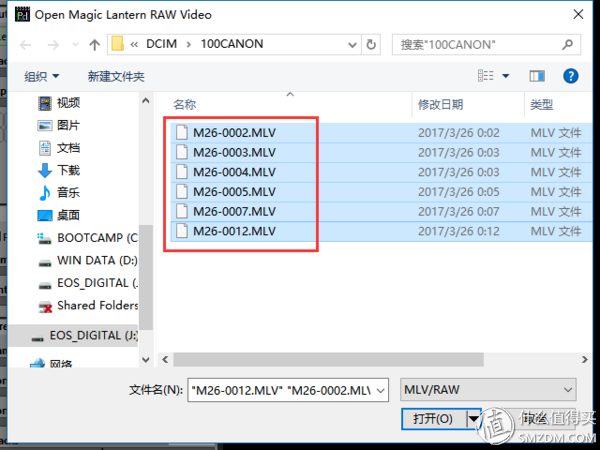
Then import the MLV or RAW file.
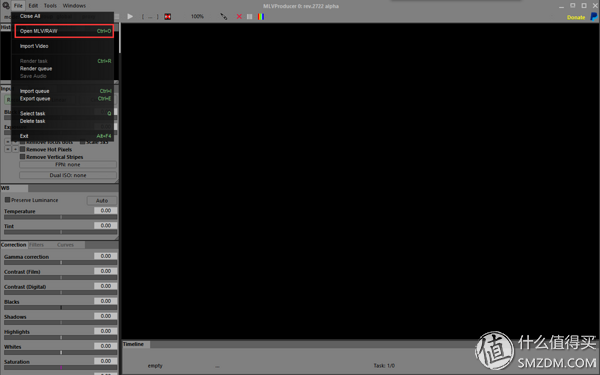
MLVProducer can support batch import.
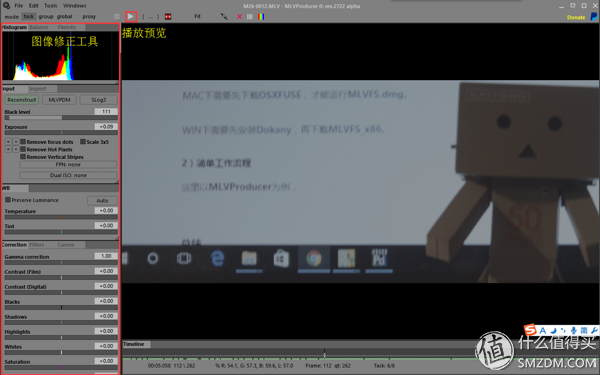
After importing, MLV video can be previewed and edited, such as adjusting black levels, correcting bad pixels, correcting white balance, and exposure.
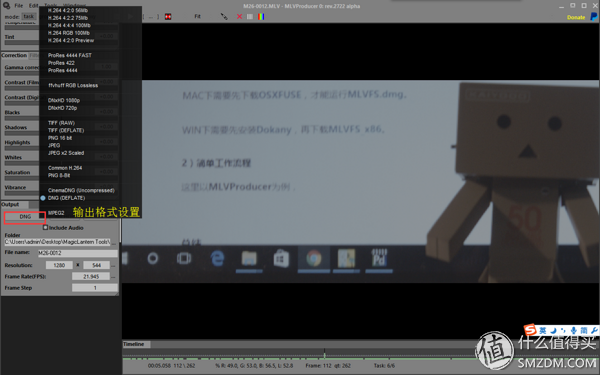
After the correction is completed, export is performed. MLVProducer supports conversion and export in many formats.
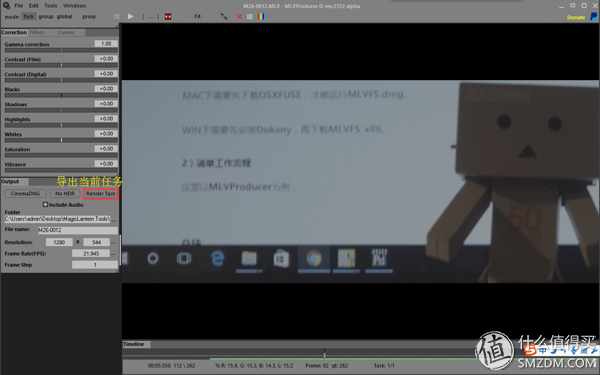
Export the current task.
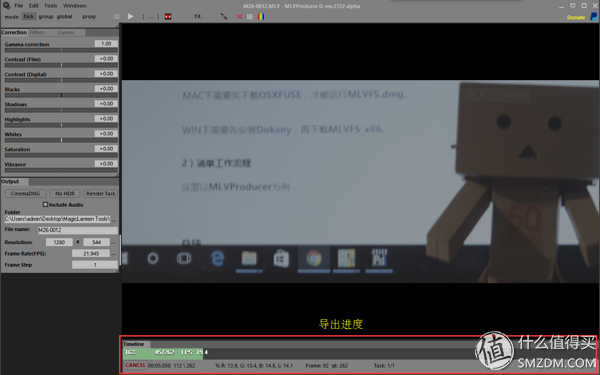
The progress of the export.
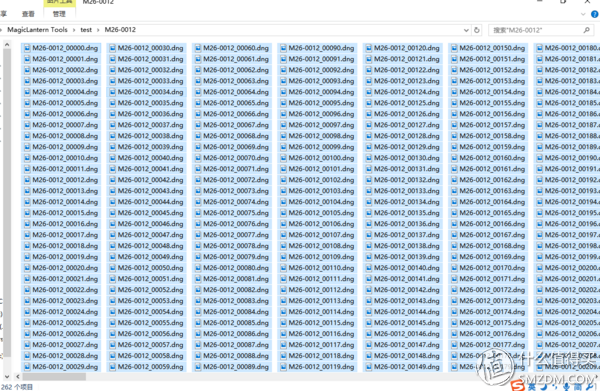
The exported result will be a lot of DNG files, if there is audio there will be a WAV file.
Of course, it is also possible to directly generate ProRes4444 mov, or a high bit rate H.264 video clip, which is convenient for the next video editing.
2.2 cdng editing and packaging synthesis
The CDNG sequence that has just been unpacked by the MLVProducer needs to be edited and re-synthesized by using software such as AE and PR. Here is an example of AE to briefly describe this process.

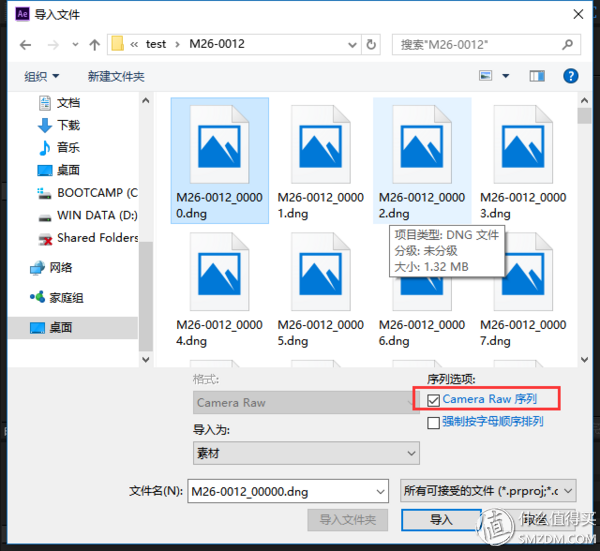
The first is to import the cdng picture sequence in AE. Right-click in the left box to import.

Select the first DNG when importing, remember to check the Camera Raw sequence and import the marching sequence
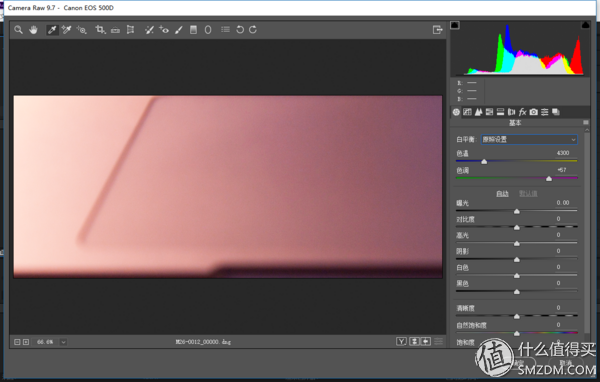
After importing, ACR (Adobe Camera Raw) will be opened in the AE, where the DNG picture can be further corrected and adjusted just like the pictures are adjusted in the LR/ACR at the same time.
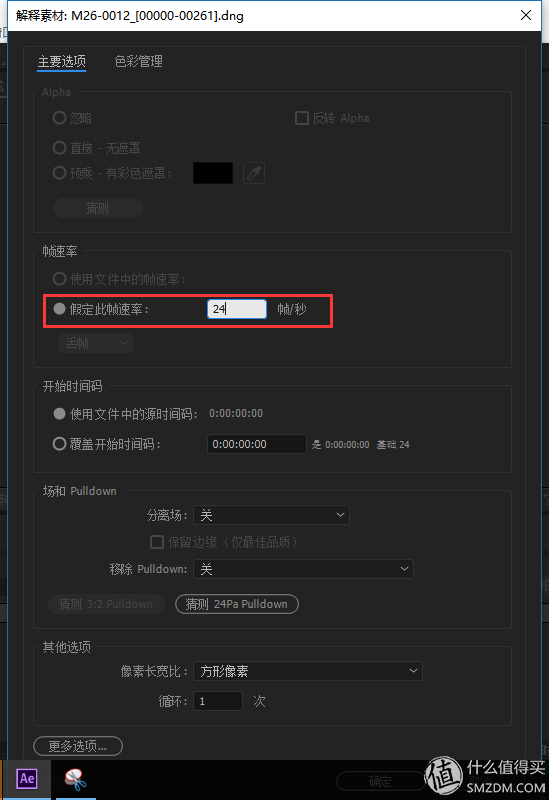
After the adjustment is completed, remember to see if the number of imported DNG sequence frames is the same as when you shot. Inconsistent words need to be changed in the material explanation. For example, the default here is 30 frames, which need to be changed to 24 frames.

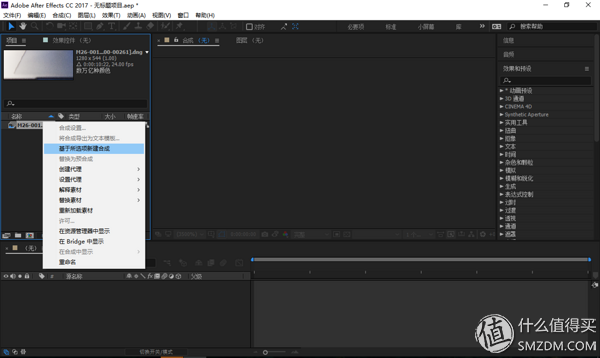
Then right-click on the DNG sequence to create a new composition based on the selected item. This will create a composition that is the same as the material properties (resolution, frame rate).
Enter the composition settings to adjust the resolution, frame number, etc. of the composition.
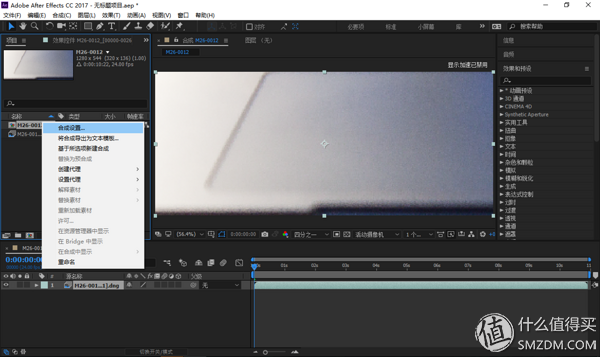
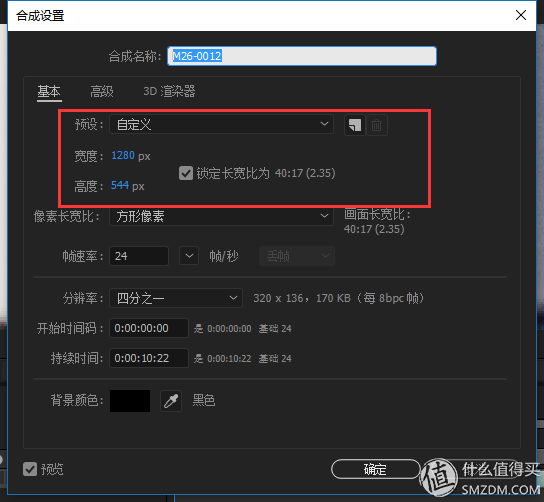
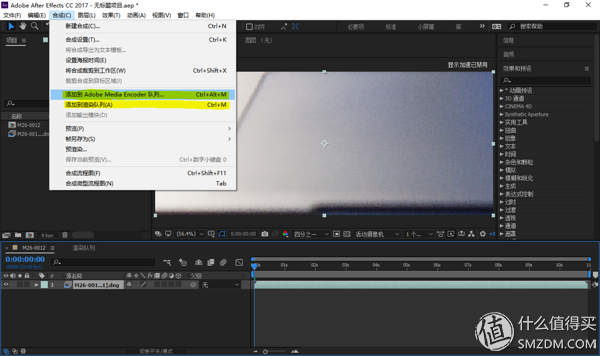
The final step is to render the composite output. This can be done directly in AE or imported into Adobe Media Encoder for more formatted output.
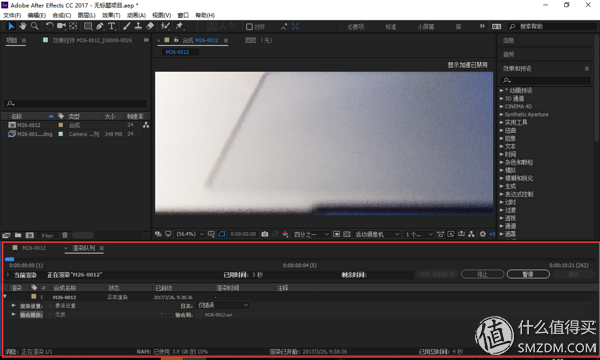
Get the finished rendering video.
A simple MLV video processing process is almost finished, and then the acquired material can be used in your later videos.
Fourth, use feelingsMagic Lantern's video RAW is very powerful, but like the photos RAW and JPEG, the video RAW has a lot of room to adjust, but it also takes up more storage space, 32G cards can generally record 7-8 minutes, A 64G card is roughly recorded for 16 minutes, and 128G is also 30-35 minutes. The requirement for continuous shooting is relatively high, requiring higher speed memory cards and faster writing of the camera body. At the same time, the processing flow of video RAW will be even more troublesome. This depends on the personal needs of use. In order to choose the quality, or for the convenience of shooting H.264. Of course, there are more and more devices that support 4K shooting now. For example, 5D4 4K uses M-JPEG to record, which is equivalent to a JPG image directly from the camera for each frame, and it can also obtain quite good results.
Regarding Magic Lantern's suggestion, if you like it, you think it is very common and the function that Canon camera originally didn't have, you can try it. If you don't think it's all that irrelevant and you don't have access to functionality at all, there's no need to brush it.
As for stability, my two DIGIC4 cameras have been used since 2013 and have not burned one card until now. I have had several crashes and have taken the battery back to restart.
The main practical function of Magic Lantern personally thinks that we introduced almost. Of course, Magic Lantern still has many functions such as HDR video (RAW and H264) shooting. Later processing will be more troublesome.
Some supplements:I don't know why I can't modify the article.
Just added here:

Thank you for your friend.
The correct way to uninstall ML is,
Insert a card with an ML plug-in and switch to the M file.
Perform the firmware upgrade again in the system.
Wait for the green words "Please Restart your Camera" to appear. After watching the screen "to uninstall Magic Lantern. Please wait for XX senconds." Waiting it will execute the uninstall program and delete the boot flag in the system. Then restart the camera.
We look forward to the ML team and the gods to allow the new model of DIGIC 6 to be added to the embrace of ML. Perhaps 4K RAW is not a dream (now 5D3 can only take non-continuous shooting to a resolution of about 3.5K), but the speed is higher. Card and fuselage writing speed and greater capacity are also essential.
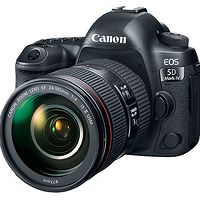 Canon EOS 5D Mark IV body SLR camera (approx. 30.4 million pixels dual-core CMOS 4K video Wi-Fi/NFC) 23,399 yuan Canon's main battle new model Jingdong direct link View Encyclopedia
 Blood Pressure Monitor,Blood Pressure Machine,Blood Pressure Checker,Digital Blood Pressure Monitor
GANSU PINGLINAG ABAY SCIENCE&TECHNOLOGY CO.,LTD , https://www.yzwtech.com